|
<< Click to Display Table of Contents >> 2605 / 2607 |
  
|
|
<< Click to Display Table of Contents >> 2605 / 2607 |
|
This file contains information on the Silent Knight 2605/2607 panel. |
|
|
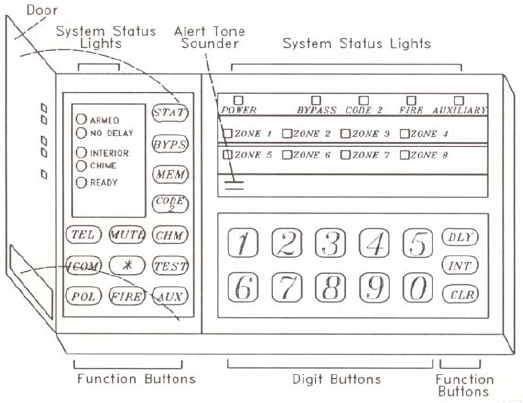
For complete instructions click the above link for the pdf manual. Click thumbnails for expanded keypad views.
Arming/Disarming
If you make a mistake while entering codes or commands, press the CLR button and start over
Away Arming
1.Make sure the green READY light is on the red ARMED light is off.
2.Make sure the INTERIOR light is on. If it is not on, press the INT button to turn it on.
3.Enter your Access Code. The green READY light goes out, and the red ARMED light comes on.
Stay Arming
1.Make sure the green READY light is on the red ARMED light is off.
2.Make sure the INTERIOR light is off. If it is not off, press the INT button to turn it off.
3.Enter your Access Code. The green READY light goes out, and the red ARMED light comes on.
Note: If the READY light is not on when you want to arm the system, determine the zones that are not ready. One LED keypads, the Zone Lights of the not ready zones will be lit. On an LCD keypad, press the STAT button to display the not ready zone. If the not ready zones can not be secured, see below for bypass instructions.
Disarming
Enter your Access Code
Resetting an alarm
•To reset an alarm, enter an Access Code.
•If a 24 hour zone is still active it will not reset. The alarm sound will shut off for 8 seconds, then it will come back on for 2 seconds, then it will shut off. The ZONE light will remain flashing, and the system can not be reset until the condition is cleared.
Bypassing
Bypassing a zone
1.Enter the number of the zone you wish to bypass.
2.Press the BYPS key.
•If the system is armed, you must also enter an Access Code. On LED keypads the ZONE light will flash a few times and then go off. The BYPASS light will remain off.
•If the system is disarmed you will only have to enter an Access Code if your installer programmed the system to require it. Once you have bypassed a zone using the LED keypad, the corresponding ZONE light will come on and flash for 4 seconds.The BYPASS light will come on and stay on, until the system is armed, or all the zones are unbypassed.
Unbypassing a zone
Enter the number of the zone you with to unbypass.
Press the BYPS key.
If the system is armed, enter your Access Code.
Alarm Memory / Event History
Alarm Memory (LED Keypads)
•Press the MEM key.
•ZONE lights representing the zones in which alarm occurred will flash for 4 seconds.
•The alarm memory only remembers alarms from the previous arm period. The next time the system is armed, the alarm memory from the previous arm period will be erased.
Event History (LCD Keypads)
•To view today's events, press 1 then the MEM key, then the TEST key.
•To view entire event history, press 1, then the MEM key, then 0, then the TEST key.
Chime Function
Press the CHM key while the system is disarmed to turn the Chime function On or Off. The CHIME light will turn on or off accordingly.
Viewing Troubles and Not Ready Zone
LCD Keypads only
Press the STAT key. Not ready zones and trouble messages will be displayed on the LCD screen.
Silencing Trouble Conditions
Press the MUTE button, or enter an Access Code (if the system is armed, entering an Access Code will disarm the system).
Setting Time and Date
LCD Keypads Only
1.Press 9, then the TEST key, followed by Code 1. The display will show 'TIME:wphhmm'.
2.w = day of the week. Enter one digit (1-7) for the day of the week (Monday-Friday, respectively)
3.p = AM/PM. Enter a 0 for AM, or a 1 for PM
4.hh = Enter 2 digits for the Hour (01-12)
5.mm - Enter 2 digits for the Minutes (00-59)
6.Press the TEST key. The display will show 'DATE:mmddyy'.
If at this point you do not want to change the date, press the MUTE button. To change the date, proceed to step 7.
7.mm = enter 2 digits for the Month (01-12)
8.dd = enter 2 digits for the Day (01-31)
9.yy = enter 2 digits for the Year (00-99)
10.Press the TEST key
Programming Access Code
LED Keypads
1.Disarm the system, if not already disarmed.
2.Press 6, then the TEST key, then enter Code 1. The CODE 2 light will be on, and the BYPASS and ZONE 1 lights will be flashing.
3.Enter the number corresponding the code you want to change (e.g. press 5 to change user code 5).
The ZONE lights will come on to indicate the code number you selected. If you select code 9 or higher, two ZONE lights will illuminate, the sum of which indicate the code selected (e.g. if you select code 10, ZONE lights 2 & 8 will illuminate as 2+8 = 10)
4.Press the TEST key. The ZONE lights will turn off.
5.Enter the New Code, then press the TEST key.
If you hear an error beep, the system detected a code conflict. Press the MUTE key and start over from step 1.
6.To change another code, press the MEM key, and then return to step 3.
7.To return to normal operations, press MUTE.
LCD Keypads
1.Disarm the system, if not already disarmed.
2.Press 6, then the TEST key, then enter Code 1. The top line of the LCD will display '8.1 CODE' for code 1, through '8.19 CODE' fir code 19.
3.Enter the number corresponding the code you want to change (e.g. press 5 to change user code 5). The bottom line of the LCD of the keypad you are using will display the secret code.
4.Press the TEST key.
5.Enter the New Code, then press the TEST key.
If you hear an error beep, the system detected a code conflict. Press the MUTE key and start over from step 1.
6.To change another code, press the MEM key, and then return to step 3.
7.To return to normal operations, press MUTE.
Deleting Codes
Follow the same directions as for adding a code, outlined above, but at step 5 press the CLR key (instead of entering a new code).