|
<< Click to Display Table of Contents >> 4720 |
  
|
|
<< Click to Display Table of Contents >> 4720 |
|
This file contains information on the Silent Knight 4720 panel. |
|
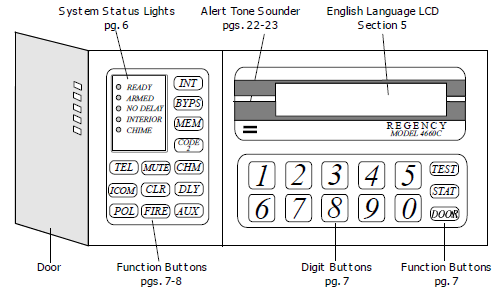
For complete instructions click the above link for the pdf manual. Click thumbnail for expanded keypad view.
Arming/Disarming
If you make a mistake while entering codes or commands, press the CLR button and start over
Away Arming
1.Make sure the green READY light is on the red ARMED light is off.
2.Make sure the CHIME/INTERIOR light is on. If it is not on, press the CHINE/INT button to turn it on.
3.Enter your Access Code. The green READY light goes out, and the red ARMED light comes on.
Stay Arming
1.Make sure the green READY light is on the red ARMED light is off.
2.Make sure the CHIME/INTERIOR light is off. If it is not off, press the CHIME/INT button to turn it off.
3.Enter your Access Code. The green READY light goes out, and the red ARMED light comes on.
Note: If the READY light is not on when you want to arm the system, or if there is a 'Not Ready' message displayed, determine the zones that are not ready. Press the STAT button to display the not ready zone. If the not ready zones can not be secured, see below for bypass instructions.
Disarming
1.Enter your Access Code.
2.Press the CHIME/INTERIOR key so that the CHIME/INTERIOR light goes off.
Resetting an alarm
•To reset an alarm, enter an Access Code.
Bypassing
Bypassing a zone
1.Enter the number of the zone you wish to bypass.
2.Press the BYPASS key.
•Enter an Access Code, if required.
Unbypassing a zone
Enter the number of the zone you with to unbypass.
Press the BYPASS key.
Enter your Access Code, if required.
Alarm Memory
•Press the MEM key.
•The LCD will show the zone and location of any alarms that may have happened.
•The alarm memory only remembers alarms from the previous arm period. The next time the system is armed, the alarm memory from the previous arm period will be erased.
Chime Function
Press the CHM key while the system is disarmed to turn the Chime function On or Off. The CHIME light will turn on or off accordingly.
Viewing Troubles
•Press the STATUS key. Trouble Error Messages will be displayed on the LCD screen, as follows:
Message |
Meaning |
Battery |
Low battery in the control panel |
AC |
Loss of AC power to the system |
Data Loss |
Control panel failed to communicate to the central station |
Line 1 |
Phone line 1 is faulty or in need of service |
Line 2 |
Phone line 2 is faulty or in need of service |
Device = 0 |
Indicates a problem with the 4720 communicator |
Device = 1 |
Indicates a problem with the (optional) printer |
Device = 2 |
Indicates a problem with the (optional) zone expander |
Device = 4 |
Problem with the intercom or telephone module |
Device 5 |
Problem with the auxiliary control module |
Device = 7 |
Indicates a problem with the EEPROM memory |
Touchpad 1-15 |
Indicates a problem with a particular touchpad |
Zone Description |
Indicated a problem with a zone number and location |
•To silence a trouble condition, press the MUTE key twice. The keypad will now show, 'SILENCED' instead of 'TROUBLE'.
Setting Time and Date
1.Press 9, then the TEST key, followed by the Main Access Code. The display will show 'TIME?'.
2.Enter one digit (1-7) for the day of the week (Monday-Friday, respectively)
3.Enter a 0 for AM, or a 1 for PM
4.Enter 2 digits for the Hour (01-12)
5.Enter 2 digits for the Minutes (00-59)
If at this point you you are prompted with the message 'DATE?', proceed to step 6.
6.Enter 2 digits for the Month (01-12)
7.Enter 2 digits for the Day (01-31)
8.Enter 2 digits for the Year (00-99)
Access Codes
Reprogramming new Access Codes
1.Disarm the system, if not already disarmed.
2.Press 7, then the TEST key, then enter the Main Access Code. The display will read, 'CODE 1'.
3.Press TEST to display the code number which you entered. If you do not want to change this particular code, press the TEST key again and it will skip to the next code in sequence.
4.If you would like to change this code, press the CLEAR key followed by the new Access Code (3 to 6 digits).
5.Press the TEST key to store the new code in memory. The display will then show the next access code in sequence. Repeat steps 4 and 5 for each additional code you wish to change.
6.To jump over more than one code, press the CHIME key, then the User Number of the code you wish to change, then the TEST key.
7.When done all required code changes, press the MUTE key twice to exit programming mode.
Deleting Codes
Follow the same directions as for adding a code, outlined above, but at step 5 press the CLEAR key (instead of entering a new code).