|
<< Click to Display Table of Contents >> 2GIG Go!Control |
  
|
|
<< Click to Display Table of Contents >> 2GIG Go!Control |
|
This file includes instructions for the 2GIG Go!Control panel. |
|
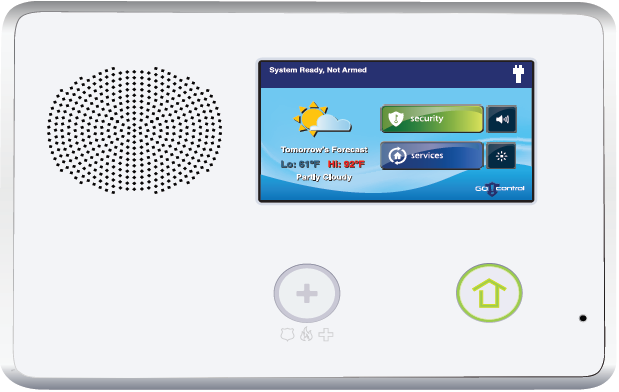
For complete instructions, click the above link for the pdf manual. Click Thumbnail for expanded keypad view.
ARMING/DISARMING
Stay ARMING
1.Verify that the HOME BUTTON is lit green indicating that the system is ready to be armed.
2.From the Security Screen or Menu Screen, press Arm.
3.If no one is expected to re-enter, use the Entry Delay Check Box to turn off the entry delay (unchecked)
4.Press Stay. The system will show the Exit Delay counting down. When the Exit Delay expires the system will be fully armed in STAY mode.
AWAY ARMING
1.Verify that the HOME BUTTON is lit green indicating that the system is ready to be armed.
2.From the Security Screen or Menu Screen, press Arm.
3.From the Arm Screen, press Away. The system will show the Exit Delay counting down. When the Exit Delay expires the system will be fully armed in AWAY mode.
DISARMING FROM STAY MODE
1.From the Security Screen or Menu Screen, press Disarm. This action displays the Disarm Code Screen.
2.Enter a valid User Code to disarm the system.
Disarming from Away Mode
1.Upon entering through a designated delay door, the Disarm Code Screen displays on the control panel, and the entry beeps sound.
2.Enter a valid User Code to disarm the system.
If you enter an incorrect code, the 'Windshield Wiper' button erases the entire entry.
BYPASSING
Force Bypass
To bypass all open sensors and arm the system
1.With one or more perimeter sensors open, press Arm from the Security Screen or Menu Screen.
2.Press Bypass All to force bypass the open sensors (including any open interior sensors).
3.Enter a User Code (unless the installer has set Quick Bypass) to activate the bypass and continue to the Arming Screen.
Manual Bypass
To selectively bypass individual sensors
1.Press Menu, Toolbox, then Bypassed Sensors.
2.Enter a User Code.
3.To not bypass a sensor, press the individual sensor name. The Bypass Symbol displays for the manually bypassed sensors. To show only the bypassed sensors, press Show Bypassed Only.
4.Press Back.
Silencing Fire Alarms
Silence the fire alarm sounder by entering your User Code.
DOOR CHIME:
The chime for all the system's sensors can be turned on or off using the Chime check box on the Menu Screen.
Alarm Memory
•If an alarm has occurred while the system was armed, the Disarm Screen shows the time and date of the alarm and the sensor(s) that triggered the alarm.
•After the system is disarmed, the Alarm Memory Screen appears. The Alarm Memory Screen shows the sensor(s) that have caused the alarm. If more than one sensor has been triggered, the display shows the order in which the alarms occurred.
•The alarm memory automatically clears the next time the system is armed. You can also check the Clear Alarm History button and press Ok to manually clear the alarm (24 hour fire and CO sensors that are still violated will remain in alarm memory).
Viewing System History
The control panel keeps a log of system events in the order in which they occur
To view the System History Log, do the following:
1.From the Home Screen, press Security.
2.From the Security Screen, press Menu.
3.On the Menu Screen, press Toolbox.
4.Enter a valid User Code to access the Toolbox.
5.From the Toolbox Screen (1 of 3), press System History. The log of system events appears.
6.Use the Up/Down Arrow buttons to scroll through the log.
To choose the events to display...
1.Press Filters.
2.Use the Check Boxes to select the events to display.
3.Press Ok when finished.
System Troubles
|
Trouble Alert Icon |
•If the system detects trouble, it flashes the Trouble Alert Icon on the Security Screen, and sounds 6 beeps every minute. Scrolling text along the top of the display also describes the trouble condition.
•The Trouble Alert Icon displays a number in the upper right corner. This is the number of current trouble alerts.
•The Trouble Alert Icon flashes until the trouble alerts are acknowledged, then it remains constantly lit until all the troubles are corrected. When all troubles are corrected, the icon disappears completely.
1.To view current trouble alerts, press the Trouble Alert Icon.
2.View the listed trouble events. If there are more than 3 alerts, use the Up/Down Arrows to scroll through the list.
Setting the Date and Time
1.From the Home Screen, press Security.
2.From the Security Screen, press Menu.
3.From the Menu Screen, press Toolbox.
4.From the Toolbox Screen (1 of 3), press the Right Arrow.
5.From the Toolbox Screen (2 of 3), press Set Date or Set Time.
6.Use the Up/Down Arrows to set the current date or time.
7.Press Ok. A Confirmation Screen showing the set date and time appears.
8.Press Ok.
PROGRAMMING ACCESS CODES
|
Only the person with the Master User Code can add or change the other User Codes. |
Entering User Management
1.From the Home Screen, press Security.
2.From the Security Screen, press Menu.
3.From the Menu Screen, press Toolbox.
4.Enter the Master User Code.
5.On the Toolbox Screen (1 of 3), press User Management.
The User Management Screen displays 3 users at a time. Use the Up/Down Arrows to scroll through the list.
Adding a User Code
|
User Codes 0000 and 0001 are not permitted. |
1.From the User Management Screen, press one of the Add User buttons.
2.Enter a 4 digit code for the new User Code and press Ok.
3.Enter the Code again to confirm the code and press Ok. A Confirmation Screen appears.
4.Press Ok. The User Codes Access Options Screen appears.
5.Select Always to set this User Code to always be valid.
6.Press Back.
Changing a User Code
1.From the User Management Screen, press the User button to change the User Code.
2.Ensure that the currently selected User Code (or Pin Number) appears, and press Change Pin.
3.Enter a new 4 digit User Code (or Pin Number) and press Ok.
4.To confirm the User Code, enter the Pin again and press Ok. A Confirmation Screen appears, showing that the User Code was changed.
5.Press Ok.
Deleting a User Code
1.From the User Management Screen, press the User button.
2.Press Delete.
3.A Confirmation Screen appears to verify that you really want to delete the User Code. If Ok, press Delete User or press Cancel to return to the User Codes Access Options Screen.
4.A Confirmation Screen appears displaying the User Code that was deleted. Press Ok.