|
<< Click to Display Table of Contents >> Commander |
  
|
|
<< Click to Display Table of Contents >> Commander |
|
This file contains instructions for the ITI Commander panel. |
|
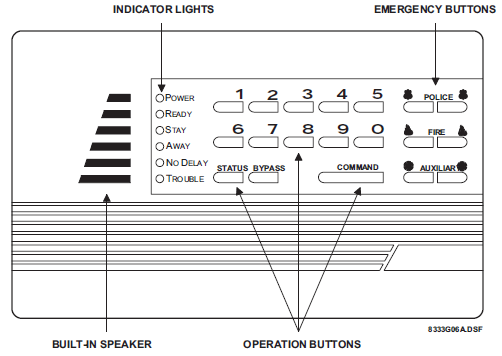
For complete instructions click the link above for the pdf manual. Click thumbnail for expanded keypad view.
ARMING/DISARMING
AWAY ARMING
1.Verify that the panel's READY light is on or blinking.
2.Enter your Access Code, then press the 3 key.
Stay Arming
Verify that the panel's READY light is on or blinking.
Enter your Access Code, then press the 2 key.
Disarming
Enter your Access Code, then press the 1 key.
Turning off Accidental Alarm
Enter your Access Code, then press the 1 key. The panel announces, 'Sensor [sensor #] [alarm type] alarm memory. Alarm system is OFF'.
Bypassing
Indirect Bypasing
Used to bypass all open sensors at the time of arming
Arm the system. If the panel announces, 'Sensor [Sensor #] open', and sounds a protest, continue to step 2. If the panel arms successfully you do not have to bypass any sensors.
Press BYPASS. The panel announces, 'Alarm system is ON [Level #]. Sensor [Sensor #] is bypassed'.
Direct Bypassing
Used to selectively bypass individual sensors
Enter Primary Access Code, then 2 or 3, to arm to the desired level.
Enter Primary Access Code, then press BYPASS, then enter the 2 digit Sensor Number (01-18). The panel announces, 'Sensor [Sensor #] bypassed'.
Repeat step 2 to bypass another sensor.
|
Fire sensors can not be bypassed. These include Smoke, Heat, and Fire Pull Stations |
Removing all sensor bypasses
Change the Security Level
Removing a single sensor bypass
1.Enter the Primary Access Code.
2.Press the BYPASS key.
3.Enter the Sensor Number. The panel announces, 'Sensor [Sensor #] ON'.
If the panel announces, 'Invalid, try again', check that the sensor is closed, then repeat steps 1-3.
4. Repeat steps 1-3 to remove another sensor bypass.
CHIME feature
To turn Chime on or off:
1.Disarm the system if not already disarmed.
2.Enter an Access Code, then press the 7 key. The panel announces, 'On' or 'Off'.
System Status
Whenever you disarm the system, or experience problems, press the STATUS button. The panel may notify you of the following conditions:
•Sensors that are open or have covers off
•Sensors with low batteries
•Sensors that are bypassed
•Loss of AC power
•Low back up battery
•Sensor alarms that occurred during the armed period
•Sensors experiencing communication failures
Alarm memory
To hear alarms in memory
Press COMMAND, then press STATUS.
The panel announces, 'Sensor [sensor #] [alarm type] Alarm Memory'. If no alarms occurred during the arming period, the panel announces, 'Alarm Memory is OK'.
To clear alarm memory
1.Enter any Access Code, then press 9. The panel and interior sirens sound one long beep and the panel announces, 'Sensor test is ON'.
2.Enter any Access Code, then press1 to exit out of sensor tests. The panel announces, 'Alarm system is OFF'. The alarm memory is now empty.
Access Codes
Changing Primary Access Code
1.Enter the Primary Access Code, then press the STATUS key, then press 8. The panel beeps once.
2.Enter the new Primary Access Code. After 5 seconds, the panel announces, '[new primary access code] OK', indicating that the Primary Access Code was changed.
Temporary Access Code
The Temporary Access Code allows you to perform all system commands except changing access codes and bypassing sensors directly
To Add or Change the Temporary Access Code
1.Enter the Primary Access Code, then press the STATUS key, then press 7. The panel beeps once.
2.Enter the Temporary Access Code. After 5 seconds, the panel announces, '[temporary access code] OK', indicating that the Temporary Access Code was changed.
To Disable the Temporary Access Code
1.Enter the Primary Access Code, then press the STATUS key, then press 7. The panel beeps once.
2.Enter the Primary Access Code. After 5 seconds, the panel announces, '[primary access code] OK', indicating that the Temporary Access Code was deleted.
Seconday Access Codes
Up to 4 Secondary Access Codes can be used. They behave in the same way as Temporary Access Codes, however Secondary Access Codes can only be programmed by the installer.