|
<< Click to Display Table of Contents >> Magellan 6250 |
  
|
|
<< Click to Display Table of Contents >> Magellan 6250 |
|
This file contains instructions for the Paradox Magellan 6250 panel. |
|
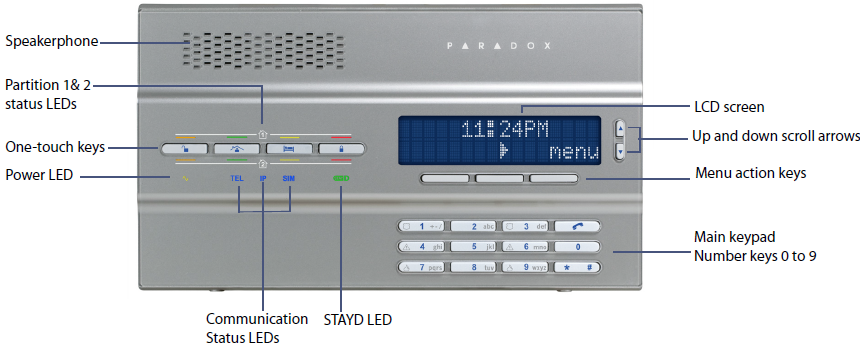
For complete instructions, click the above link for the pdf manual. Click thumbnail for expanded keypad view.
Arming/Disarming
|
|
|
Regular Arming
1.Press the ARM key.
2.Enter a User Code.
3.The Armed LED will turn red indicating system has been armed.
Stay Arming
1.Press the STAY key.
2.Enter a User Code.
3.The Stay LED will turn green indicating that the system has been Stay Armed.
4.If you have access to both partitions, press the key corresponding to the desired partition (1 or 2). For both partitions, press the other key after the confirmation beep.
Disarming an armed System
Enter a User Code. The Off LED will turn orange.
Disarming a system in alarm
1.Press the OFF key.
2.Enter a User Code.
Zone Bypassing
1.Press the menu key.
2.Select '01-BYPASS ZONES' then press ok.
3.Scroll through the zones and use the left menu key to bypass or unbypass zones.
4.Press exit to return to the previous menu.
Alarm Memory
|
Information Symbol |
The console will indicate that there is alarm in memory by displaying the Information Symbol.
1.Press the Information Symbol menu action key.
2.Press the Up/Down Scroll keys to scroll through the list of alarm messages.
3.Once the alarm messages have been viewed, select 'exit'. The alarms will be cleared, and the Information Symbol will be removed from the display.
Setting Chime Zones
You can program the system to emit a beep whenever zones designated as 'Chime Zones' are opened. To set Chime Zones:
1.Press the menu key.
2.Select '04-CHIME ZONE' then press ok.
3.Select the zone you would like to modify, then press edit.
4.Select the tone that will play when the zone opens, then press ok.
5.Press back to return to the previous menu.
Setting the Time and Date
1.Press the menu key.
2.Select '08-SYSTEM SETUP', then press ok.
3.Enter the Master Code.
4.Scroll through the options, and select '04-Time and Date', then press ok.
5.Select 12 or 24-hour time format.
6.Set the time, then press ok.
7.Set the year, month, and day. Press ok to return to the previous menu.
Adding or Modifying Users
1.Press the menu key.
2.Select '08-SYSTEM SETUP', then press ok.
3.Enter the Master Code.
4.To enter the Users menu, press ok.
5.To modify the Master Code, press ok and continue to step 7. To continue to user codes, press next.
6.Scroll through the 16 available users. To select a user press ok.
7.Enter a user code and press ok.
8.Press next.
9.Press ok to enter the user's name. When finished, press ok.
10.Press next.
11.If the system is divided into areas (partitions), you will be given the option to assign the user to an area, press edit. To program another user press yes, to exit press no.