|
<< Click to Display Table of Contents >> PC 1500/1550 |
  
|
|
<< Click to Display Table of Contents >> PC 1500/1550 |
|
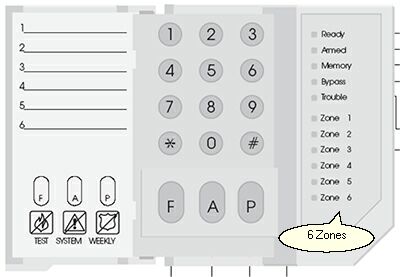
This file includes instructions for the DSC PC1500 / PC1550 |
|
For complete instructions, click the above link for the pdf manual. Click Thumbnail for expanded keypad view.
ARMING/DISARMING
Away ARMING
Check to see that the 'Ready' light is lit. Enter a 4-digit Access Code. The 'Armed' light will come on. Leave through an exit door.
Stay ARMING
Check to see that the 'Ready' light is lit. Enter a 4-digit Access Code. The 'Armed' light will come on. Do Not leave premises.
DISARMING
Enter your Access Code to disarm anytime the system is armed.
DISARMING ERROR
If your code is invalid, the system will not disarm and a 2 second error tone will sound. If this happens hit # key, and try again.
BYPASSING
With the system disarmed.
1.Press * 1
2.Enter the 1-digit Zone Number(s) of the zone(s) to be bypassed (1-6).
3.To exit bypassing mode and return to the Ready state, press #.
|
Bypassed zones are automatically canceled each time the system is disarmed and must be bypassed again, if required, before the next arming. |
RESETTING SMOKE DETECTORS
Your installer will inform you if the * 7 command has been set up to reset smoke detectors on your system
To reset the smoke detectors to normal, first clear all products of combustion from the detectors. Reset
the detectors by entering * 7 on the keypad.
If the detectors are clear of smoke, they will return to normal. If the detectors still have smoke in them, the
alarm will sound again.
DOOR CHIME
1.Enter * 6 then the Master Access Code.
2.Press 6. The keypad will beep 3 times.
3.Press # to exit
Repeating this procedure will turn off this feature
MEMORY LIGHT
Lights to indicate that an alarm has occurred
1.Press * 3 to view which zones generated the alarm.
2.Press # to exit
The memory will be cleared when the panel is re-armed
TROUBLE CODES
Press * 2 to enter trouble display. The 'Zone' lights will indicate the type of trouble condition
1.Low Battery
2.AC Fail
3.Blown Fuse (Bell or Aux fuses)
4.Failed Attempt To Communicate
5.Fire Loop Trouble
6.Loss of Time on System Clock
Press # to exit trouble display. The 'Trouble' light will stay on until the trouble is resolved.
Time & Date Programming
1.Press * 6 plus your Master Access Code to enter User Functions.
2.Press 1 to select Time & Date.
3.Enter the time in 24-hr. format (HH:MM)
4.Press # to exit programming.
PROGRAMMING ACCESS CODES
It is highly recommended that all requests for assistance with access codes be referred to the dealer!
ADDING OR CHANGING CODES
1.Press * 5 plus the (Master Access Code). The 'Memory', 'Bypass', and 'Trouble' lights will flash and the 'Zone' lights will show which codes have already been programmed. Up to 6 codes can be programmed.
2.Press any key (from 1 to 6) to indicate which one of the 6 codes is being programmed. That 'Zone' light will flash.
3.Enter the new 4-digit Access Code
4.Press # to exit.
|
Take special care when changing the Master Code (Code 1). Errors changing the Master Code will likely require a service call from a technician to correct.The Master Code must not be deleted. |
ERASING A CODE
To Erase a code, follow the same procedure, except, at step 3, enter * * * * instead of a 4 digit number.