|
<< Click to Display Table of Contents >> SX-V |
  
|
|
<< Click to Display Table of Contents >> SX-V |
|
This file contains instructions for the ITI SX-V panel. |
|
|
For complete instructions click the above link for the pdf manual. Click thumbnails for expanded keypad views.
Arming/Disarming
AWAY Arming
Enter your Access Code.
Press the AWAY (4) key. The keypad will beep 4 times.
Stay Arming
Enter your Access Code.
Press the EXTERIOR (3) key. The keypad will beep 4 times.
Disarming / Canceling Accidental Alarm
Enter your Access Code.
Press the DISARM (0) key. The keypad will emit 1 long beep.
Understanding the Display
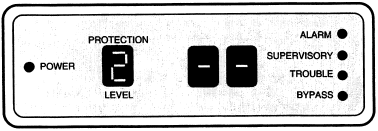
Unlike most alarm systems, where system information and status are displayed on the keypad, the SX-V displays this information directly on the CPU (Control Panel), as seen below:
|
Power LED
When on, the system is operating on main A/C power.
When blinking, the main A/C power has been lost and the system is operating on back up battery power.
When off, the system is not functional
Protection Level
Indicates the current protection level
Sensor Number
This is the 2-digit display in the middle. Sensor numbers will be displayed here, in conjunction with the ALARM, SUPERVISORY, TROUBLE, and BYPASS LEDs, to indicate the status of the sensor displayed.
Bypassing
1.With all sensors closed, arm the system to the desired level.
2.Enter your Access Code.
3.Press the BYPASS key.
4.Enter the 2 digit Sensor Number you want bypassed. A single beep will sound and the specific sensor will be bypassed.
If you wish to bypass more than 1 sensor, repeat steps 2-4 for each additional sensor
Door Chime
1.Enter your Access Code.
2.Press the CHIME (2) key.
3.Listed for 2 short beeps.
STATUS
If you are not within site of a display, you can determine the current protection level by pressing the STATUS key. The number of beeps heard indicates the protection level (e.g. 2 beeps for protection level 2).
Alarm Memory
If you are in sight of a display, when you press the STATUS key, the sensor number for any sensor that went into alarm during the last arming period will appear in the display. If no sensor numbers appear, no alarms occurred.
Trouble Alarms
The CPU display may indicate different trouble alarms with the use of specific sensor numbers, in conjunction with the ALARM light being lit, as follows:
•Sensor 90 (ALARM light lit): Indicates a loss of A/C power to the CPU
•Sensor 91 (ALARM light lit): Indicates a weak CPU back up battery
•Sensor 92 (ALARM light lit): Indicates a CPU cover tamper (cover open)
•Sensor 96 (ALARM light lit): Indicates that the CPU has failed to communicate to the monitoring station
•Sensor 97 (ALARM light lit): Indicates a loss of phone line
Temporary Access Code
•The Primary Access Code can only be changed by the service company.
•A second, Temporary, access code can be programmed for use by babysitters, repairmen etc.
•This code can be used to arm the system and change protection levels.
•This code can only disarm to level 1; it can not disarm to level 0, and can not be used for bypassing.
Enabling the Temporary Access Code
1.Enter your Access Code.
2.Press the STATUS key.
3.Enter the 4 digit Temporary Access Code.
4.Watch for the 'Bouncing Balls' in the CPU display, and listen for a single beep. This indicates acceptance.
Disabling the Temporary Access Code
1.Enter your Access Code.
2.Press the STATUS key.
3.Enter your Access Code again.
4.Watch for the 'Bouncing Balls' in the CPU display, and listen for a single beep.