|
<< Click to Display Table of Contents >> Z1100e |
  
|
|
<< Click to Display Table of Contents >> Z1100e |
|
This file contains instructions for the Moose Z1100e panel. |
 LED Keypad |
 LCD Keypad |
For complete instructions, click the above link for the pdf manual. Click thumbnails for expanded keypad views.
Arming/Disarming
Note: 'PAC' stands for Personal Authorization Code (Access Code)
LED Keypad
Away Arming
1.Verify that the Ready To Arm light is one
2.Press ARM (1) then enter your PAC. The keypad will start beeping and the red ARMED light will come on.
Stay (Interior Off) Arming
1.Press INTERIOR (4). The INTERIOR OFF light will come one.
2.Press ARM (1) then enter your PAC.
Disarming
Press ARM (1) then enter your PAC. The red ARMED light should be off.
If this does not work, press * and begin again.
LCD Keypad
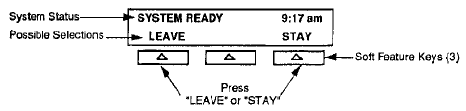
With the system disarmed and all zones secure the display will read 'SYSTEM READY', as illustrated below. Select whether you plan to stay or leave by pressing the Soft Feature Key located directly below the appropriate displayed word.
|
Away Arming (If you select 'LEAVE')
1.The display will indicate whether the INTERIOR and DELAY will be on or off when the control is armed and requests that you enter your code to permit arming.
2.Enter your PAC. The keypad will beep and the display will indicate 'SYSTEM ARMED', followed by the amount of exit time that is available.
3.Exit immediately.
Stay Arming (if you select 'STAY')
1.The display will indicate whether the INTERIOR and DELAY zones will be on or off when the system is armed and allows changes to be made if desired.
2.Press CONFIRM if the interior and delay are set up as desired, or, press the Center Soft Key to CHANGE the Interior status, or the Right Soft Key to CHANGE the Delay status, then press CONFIRM.
3.Updated status is displayed. Enter your PAC. The display will indicate 'SYSTEM ARMED'.
Note: If an error is made entering your PAC, press the * key to clear the entry and try the code again.
If System Is Not Ready To Be Armed
1.The display will indicate 'ZONE(S) NOT READY'.
2.Press DISPLAY to obtain a display of each zone that is not ready. If more than one zone is not ready, press NEXT to display the next consecutive zone. When all zones that are not ready have been identified, press QUIT.
3.Attempt to secure all zones that are not ready (close doors, windows etc.)
4.Bypass zones that can not be corrected (see below)
5.When all zones are ready, or bypassed, the display will read 'SYSTEM READY'. Press LEAVE or STAY and proceed as described above.
Disarming
1.Press DISARM.
2.Enter your PAC. The display will read 'SYSTEM IS DISARMED' and return to the disarmed status.
WHAT TO DO IF THE ALARM SOUNDS
LED KEYPAD
Press ARM (1) then enter your PAC. The red ARMED light should be off.
If this does not work, press * and begin again.
LCD Keypad
1.Press SILENCE to silence the keypad sounder
2.Enter your PAC when prompted.
3.The display will indicate the type of alarm and the option to QUIT or DISPLAY. Press DISPLAY to display the zone that caused the alarm. If TIME is displayed, it may be pressed to determine the time and date of the first zone that alarmed.
4.Press QUIT to exit to the normal mode.
Bypassing (Shunting)
The system must be disarmed
LED Keypad
Bypassing a zone
Press SHUNT (#) and the Zone Number to be bypassed (01-16). The READY TO ARM light will start to blink.
Remove Bypassed Zone(s)
Press SHUNT (#) and then 9, which clears all bypassed zones. The READY TO ARM light will stop blinking.
LCD Keypad
Bypassing Zones
1.If LEAVE or STAY are pressed while the system is in a NOT READY TO ARM state, the option to BYPASS will be displayed.
2.Pressing BYPASS will bypass the indicated zone that is not ready
3.If more zones are not ready, press NEXT to display the next consecutive zone, and bypass if necessary.
4.When all zones that are not ready have been bypassed, pressing NEXT will display Interior and Delay status and request your PAC to authorize arming.
5.After arming, the display will read 'SYSTEM PARTIALLY ON'. 30 seconds after system is armed, the display will change to 'SYSTEM ARMED'.
|
Menu Scroll Key |
Alternately, you can enter Bypass mode by pressing the Menu Scroll Key three times to obtain Menu 3, and then press the Right Soft Feature Key to select the Bypass feature.
Removing Bypasses
All bypasses are removed upon disarming, or may be manually bypassed by pressing # then 9.
The Reset (*) Key
The * key is used to reset the system after an error has been made. When in doubt, press the * key and begin again.
Alarm Memory
The ARMED light blinks to visually remind you when an alarm has occurred. The Alarm Memory command may be used to identify the specific zone that caused the alarm.
LED KEYPAD
1.Lift the keypad door to reveal the zone location label
2.Press ALARM MEMORY (3) then enter your PAC. The lights on the keypad now become alarm memory indicators for zones 01-08. Any light that is on indicates the zone that caused the most recent alarm
3.If your system has more than 8 zones, press ALARM MEMORY (3) once again to display alarm memory indicators for zone 09-16
4.Reset the blinking ARMED light by pressing the * key.
LCD KEYPAD
|
Menu Scroll Key |
The Menu Scroll Key provides menus of special features that may be selected by pressing the corresponding Soft Feature Key.
|
1.Press the Menu Scroll Key to bring up Menu 1
2.Press the Center Soft Feature Key to obtain a display indicating which zone activated the most recent alarm.
3.The time and date of the alarm may also be displayed by pressing and holding TIME when prompted.
4.Press QUIT to exit.
Zone Status Display
LED Keypad
1.Lift the keypad door to reveal the zone location label
2.Press ZONE STATUS (2) then enter your PAC.
3.The lights on the keypad now become status indicators for zones 01-08, as follows:
LIGHT ON |
ZONE OPEN |
LIGHT BLINKING |
ZONE BYPASSED |
LIGHT OFF |
ZONE SECURE |
4.If your system is equipped with more than 8 zones, press ZONE STATUS (2) once again to display the status of zones 09-16
LCD KEYPAD
|
Menu Scroll Key |
The Menu Scroll Key provides menus of special features that may be selected by pressing the corresponding Soft Feature Key.
|
1.Press the Menu Scroll Key to bring up Menu 1
2.Press the Left Soft Feature Key to obtain information regarding the condition of each zone.
3.First the display indicates the number of each zone that is not ready.
4.Then, the display indicates the name of each zone and provides a menu of three choices: NEXT to display status of the next consecutive zone; BYPASS to temporarily remove the zone from service, and QUIT to exit Zone Status Mode.
Setting the Clock
|
Menu Scroll Key |
1.Press the Menu Scroll Key 5 times.
2.Press the SET CLOCK soft feature key.
3.Use the Right Arrow key to move the cursor through the field.
4.Use the numeric keypad to enter digits for the Month, Day, Year, Hour, Minute, and Second.
5.Move the cursor to the far right and press any digit to change the am/pm status.
6.Press RETURN to exit this mode.
A/C Fail / Low Battery / BAD Fuse
•The green POWER light on the keypad will be on when both the electricity and standby battery are present and functional
•If the POWER light is off, it means that the panel has lost it's main A/C power and is operating on the standby battery
•If the standby battery is weak or the system fuse is blown, the keypad will beep and will display 'LOW BATTERY' or 'BAD FUSE' and provide a choice to SILENCE the keypad sounder.
Personal Authorization Code Programming
•The system requires a mandatory 5 digit code be entered when programming PACs. If you wish to use a code that is shorter than 5 digits, add trailing zeros. The trailing zeros will not be considered part of the PAC (e.g. entry of 78900 will result in a PAC of 789).
•Once you have entered the programming mode, you should complete the entire procedure, pausing no more than 6 seconds between digit entries, or else a 2 second error tone will soung
•If you hear an error tone, or make an error while programming, press the * key repeatedly until you hear 3 beeps. This means the system has left programming mode, and you must restart the procedure from the beginning.
LED KEYPAD
Changing Your PAC
1.Disarm the system, if not already disarmed
2.Press PROGRAM (9) and enter the Master Programming Code. The keypad will emit 2 beeps, and all lights will flash when Programming Mode is successfully entered.
3.Press the number corresponding to the PAC you wish to program (1-16), then press the # key. You will hear 3 beeps.
4.Enter the 5 digits for the new PAC. The keypad will emit one short beep followed by one long beep, then the system will exit Programming Mode automatically.
Changing the Master Programming Code
1.Disarm the system, if not already disarmed
2.Press PROGRAM (9) and enter the Master Programming Code. The keypad will emit 2 beeps, and all lights will blink.
3.Press 1 plus 8 plus # which instructs the control that you wish to change the Master Programming Code.
4.Enter the 5 digits for the new Master Programming Code. The keypad will emit one short beep followed by one long beep, then the system will exit Programming Mode automatically.
LCD Keypad
|
Menu Scroll Key |
Changing your PAC
1.Press the Menu Scroll Key 3 times to obtain menu 3
2.Press PROGRAM.
3.Enter your Master Programming Code.
4.Press CONTROL PANEL.
5.The display will read 'ENTER A FUNCTION NUMBER'. Enter the user number of the code you wish to program (01-17), then press FIND when prompted.
6.The display will indicate the first digit of the present code. Enter each digit of the desired new code. As each digit is entered the flashing cursor will advance to the right.
7.When all 5 digits have been entered, the code will be changed and the system will automatically exit the programming mode.
Changing your Master Program Code
Follow the same procedure as for changing your PAC, above, but at step 5 enter the user number 18.
Deleting a PAC
1.Press the Menu Scroll Key 3 times to obtain menu 3
2.Press PROGRAM.
3.Enter your Master Programming Code.
4.Press CONTROL PANEL.
5.The display will read 'ENTER A FUNCTION NUMBER'. Enter 22 then press FIND when prompted.
6.Enter the 2 digit User Number of the PAC to be deleted (01-17).
7.The code is now deleted. The system will automatically exit the programming mode.