|
<< Click to Display Table of Contents >> Z1250 |
  
|
|
<< Click to Display Table of Contents >> Z1250 |
|
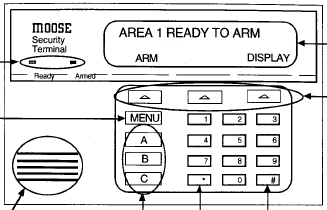
This file contains instructions for the Moose Z1250 panel. |
|
For complete instructions, click the above link for the pdf manual. Click thumbnail for expanded keypad view.
Arming/Disarming
Arming
1.Verify that the keypad display indicates 'READY TO ARM'.
2.Press the ARM soft key. The keypad prompts you to 'ENTER PASSCODE'.
3.Enter your User Code, then press the ENTER soft key.
4.The LCD now displays the ARMING LEVEL prompt:
AWAY |
Completely arms all detection devices |
STAY |
Arms only perimeter zones while bypassing interior zones |
NIGHT |
Arms all perimeter and specified interior zones (as selected by the installer) |
5.Press the soft key beneath the desired level of arming. The screen briefly displays the selected arming level.
6.While the exit delay counts down, you can press the INSTANT soft key to disable the Entry Delay.
7.When exit delay expires, the screen displays the 'ARMED' message and gives the DISARM prompt.
DISARMING
1. Press the DISARM soft key. The display will prompt to 'ENTER PASSCODE'
2.Enter your User Code and press the ENTER soft key.
System Not Ready To Arm
1.The display will indicate 'NOT READY'.
2.Press DISPLAY to obtain a display of each zone that is not ready. If more than one zone is not ready, press NEXT to display the next consecutive zone. When all zones that are not ready have been identified, press QUIT.
3.Attempt to secure all zones that are not ready (close doors, windows etc.)
4.Bypass zones that can not be corrected (see below)
5.When all zones are ready, or bypassed, the display will read 'READY'. Follow the Arming instructions above.
WHAT TO DO IF THE ALARM SOUNDS
1.Press SILENCE to silence the keypad sounder
2.Enter your USER CODE. If you make a mistake entering your User Code, press CLEAR and reenter the code.
3.Press the ENTER soft key. The LCD then displays the first zone that went into alarm.
4.Press the soft key corresponding to TIME to display the time and date that the system alarmed.
5.Press QUIT to return to normal LCD display.
Bypassing (Shunting)
The system must be disarmed
Bypassing Zones
1.If this programming option is enabled, after you select ARM, enter your User Code, and select the Arming Level, the display indicates the system is NOT READY and gives you the option to DISPLAY the violated zones.
2.On the Display Screen, press BYPASS to bypass the faulted zone(s). The LCD will display 'READY W/ BYPASS'
3.Press the ARM soft key and follow the normal arming sequence.
Removing Bypasses
All bypasses are removed upon disarming.
Resetting smoke detectors
Allows you to reset the smoke detectors after an alarm. If the alarm continues or reoccurs after a reset attempt, contact your installation company
1.Press the MENU key, twice.
2.Press the SMOKE RESET soft key.
3.Enter your User Code, and press the ENTER soft key.
The CLEAR Key
The CLEAR key is used to reset the system after an error has been made. When in doubt, press the CLEAR key and begin again.
VIEWING ZONE STATUS
1.Press the MENU key.
2.Press the VIEW STATUS soft key.
3.Enter your User Code and press the ENTER soft key.
4.Zones names and status will appear. While viewing zone status, you may be permitted to bypass any zones defined as bypassable.
DOOR CHIME
1.Press the MENU key.
2.Press the ENABLE CHIME soft key.
3.Enter your User Code and press the ENTER soft key.
4.Press CHANGE to turn the chime on or off (alternately).
5.Press QUIT when done.
Setting the Clock
1.Press the MENU key 4 times.
2.Press the SET CLOCK soft key.
3.Enter your User Code and press the ENTER soft key.
4.Use the Left and Right Arrow keys to move the cursor through the field.
5.Use the numeric keypad to enter digits for the Month, Day, Year, Hour, Minute, and Second.
6.Press QUIT to return the display to the status screen.
Trouble Conditions
If a trouble condition exists, the LCD displays alternates between a system trouble message and the area's status. Some trouble conditions also produce an audible alarm.
When more than one trouble is present, the display scrolls through the trouble conditions and the area's status, pausing 2 seconds for each item displayed.
Trouble conditions when the system is disarmed
1.When the LCD scrolls through trouble and status, press DISPLAY to define the problem.
2.If the trouble displayed also has an audible alarm, there will be an option to SILENCE the alarm.
3.Press SILENCE, enter your User Code, and press ENTER.
Trouble conditions when the system is armed
1.When the LCD scrolls through trouble ans status, press DISPLAY to define the problem.
2.Enter your User Code and press ENTER. Any audible trouble alerts will be silenced at this point.
3.If there are multiple troubles, press NEXT to view the next trouble(s)
4.Press QUIT to exit the trouble display
USER Code Programming
Adding / Changing User Codes
1.Press the MENU key 3 times.
2.Press the PROG OPTIONS soft key.
3.Enter a valid Master Code (highest authority level), and press the ENTER soft key.
4.Press the USER CODES soft key. The screen displays the programmed information of the first user code. Only codes that share the same area assignment as the master code will be displayed.
5.To change a displayed code, simply enter the new digits.
6.Once you enter the correct digits, press the STORE soft key.
7.To advance to another user code, press NEXT.
8.When all codes have been added or changed, press the * key to return to the main system status display.
Deleting User Codes
1.Press the MENU key 3 times.
2.Press the PROG OPTIONS soft key.
3.Enter a valid Master Code, and press the ENTER soft key.
4.Press the USER CODES soft key. The screen displays the programmed information of the first user code.
5.Select the appropriate code using the NEXT soft key, enter a 0, then select STORE.