|
<< Click to Display Table of Contents >> Bosch D9412GV4 |
  
|
|
<< Click to Display Table of Contents >> Bosch D9412GV4 |
|
This file contains information on the Bosch D9412GV4 panel. |
|
|
|
|
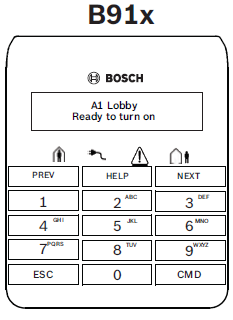
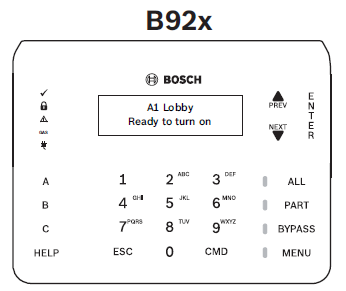
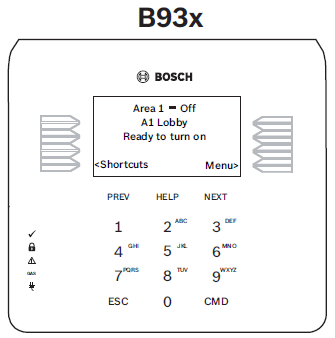
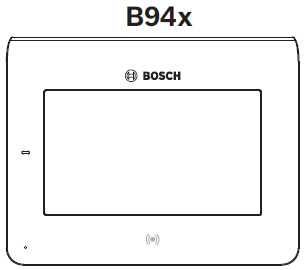
For complete instructions click the above link for the pdf manual. Click thumbnails for expanded keypad views.
Arming/Disarming
|
B94x keypad Menu Icon |
All On (Away Arming)
B92x / B91x Keypads
1.Open the Main Menu (On the B92x keypad, press the MENU key. On the B91x keypad, press CMD then 8).
2.Press 1 or ENTER to open the On/Off Menu.
3.Press 1 or ENTER to open the All On Menu.
4.Press 1 or ENTER to select All On Delay.
5.Enter your Code then press ENTER.
6.Exit the Area.
B94x / B93x Keypads
1.Open the Main Menu (on the B94x keypad, press the Menu Icon. On the B93x keypad, press the MENU softkey).
2.Press On/Off to open the menu.
3.Press All On to open the menu.
4.Press All On Delay to open the menu
5.Enter your Code then press ENTER.
6.Exit the Area.
Part On (Stay Arming)
B92x / B91x Keypads
1.Open the Main Menu (On the B92x keypad, press the MENU key. On the B91x keypad, press CMD then 8).
2.Press 1 or ENTER to open the On/Off Menu.
3.Use NEXT to go to the Part On option and press ENTER.
4.Press 1 or ENTER to open the Part On Delay option. The keypad shows 'Part On Dly'.
5.Enter your Code then press ENTER.
B94x / B93x Keypads
1.Open the Main Menu (on the B94x keypad, press the Menu Icon. On the B93x keypad, press the MENU softkey).
2.Press On/Off to open the menu.
3.Press Part On to open the menu.
4.Press Part On Delay to open the menu.
5.Enter your Code then press ENTER. The keypad shows 'Part On Dly'.
Select Area (Partition Arming)
B92x / B91x Keypads
1.Open the Main Menu (On the B92x keypad, press the MENU key. On the B91x keypad, press CMD then 8).
2.Press 1 or ENTER to open the On/Off Menu.
3.Press 1 or ENTER to open the All On Menu.
4.Use NEXT to go to the All On Select menu, then press ENTER.
5.Use NEXT and ENTER to select either the On Instant or On Delay options. The keypad responds based upon your selection.
B94x / B93x Keypads
1.Open the Main Menu (on the B94x keypad, press the Menu Icon. On the B93x keypad, press the MENU softkey).
2.Press On/Off to open the menu.
3.Press All On to open the menu.
4.Press All On Select Area to open the menu.
5.Enter your Code then press ENTER.
6.Press either On Delay or Instant. The keypad responds based upon your selection.
Disarming
1.Enter your Code.
2.Press ENTER within 8 seconds of entering the Code.
Turn Off Select (Partition Disarm)
B92x / B91x Keypads
1.Open the Main Menu (On the B92x keypad, press the MENU key. On the B91x keypad, press CMD then 8).
2.Press 1 or ENTER to open the On/Off Menu.
3.Use NEXT to go to the Off Menu then press ENTER.
4.Use NEXT to go to the Turn Off Select menu then press ENTER.
5.Use NEXT and ENTER to select an area.
6.Press ENTER to turn off your selected area.
B94x / B93x Keypads
1.Open the Main Menu (on the B94x keypad, press the Menu Icon. On the B93x keypad, press the MENU softkey).
2.Press On/Off to open the menu.
3.Press Off to open the menu.
4.Press Turn Off Select Area to open the menu.
5.Press either Off Delay or Off Instant. The keypad responds based on your selection.
Silencing Alarms
•To silence Fire or Gas alarms, enter your Code.
•To silence Burglar alarms, enter your Code then press ENTER.
Bypassing Points (zones)
Bypassing
B92x / B91x Keypads
1.Open the Main Menu (On the B92x keypad, press the MENU key. On the B91x keypad, press CMD then 8).
2.Press 1 or ENTER to open the On/Off Menu.
3.Use NEXT to go to the Bypass Menu, then press ENTER.
4.Press 1 or ENTER to open the Bypass Points Menu.
5.Select a point to bypass.
6.Press ESC to exit the menu.
B94x / B93x Keypads
1.Open the Main Menu (on the B94x keypad, press the Menu Icon. On the B93x keypad, press the MENU softkey).
2.Press On/Off to open the menu.
3.Press Bypass to open the menu.
4.Press Bypass Points to open the menu.
5.Select a point to bypass.
6.Escape from the menu.
Unbypassing
B92x / B91x Keypads
1.Open the Main Menu (On the B92x keypad, press the MENU key. On the B91x keypad, press CMD then 8).
2.Press 1 or ENTER to open the On/Off Menu.
3.Use NEXT to go to the Bypass Menu, then press ENTER.
4.Use NEXT to go to the Unbypass Menu, then press ENTER.
5.Enter you Code and press ENTER.
6.Select a point to unbypass.
7.Press ESC to exit the menu.
B94x / B93x Keypads
1.Open the Main Menu (on the B94x keypad, press the Menu Icon. On the B93x keypad, press the MENU softkey).
2.Press On/Off to open the menu.
3.Press Bypass to open the menu.
4.Press Unbypass Points to open the menu.
5.Select a point to unbypass.
6.Escape from the menu.
Go To Area (partition control)
•Use this function to perform tasks in areas other than the one you are in.
•Once you 'go' to an area you can perform tasks you have authority for in that area.
•To leave an area, press ESC.
B92x / B91x Keypads
1.Open the Main Menu (On the B92x keypad, press the MENU key. On the B91x keypad, press CMD then 8).
2.Use NEXT to go to the Actions menu option, then press ENTER.
3.Use NEXT to go to the Go To Area menu option and press ENTER.
4.Enter your Code and press ENTER.
5.Use NEXT to go to the area you wish to enter, then press ENTER.
B94x / B93x Keypads
1.Open the Main Menu (on the B94x keypad, press the Menu Icon. On the B93x keypad, press the MENU softkey).
2.Press Actions to open the menu.
3.Press Go To Area to open the menu.
4.Enter your Code and press ENTER.
5.Use the Right Arrow Icon or NEXT softkey to go to the area you want to enter, and then press Go To Area.
Resetting Sensors
B92x / B91x Keypads
1.Open the Main Menu (On the B92x keypad, press the MENU key. On the B91x keypad, press CMD then 8).
2.Use NEXT to go to the Actions menu option, then press ENTER.
3.Press 1 or ENTER to reset the sensors with the Reset option.
4.Enter your Code and press ENTER.
If you can not reset your sensor or detector, contact your security company
B94x / B93x Keypads
1.Open the Main Menu (on the B94x keypad, press the Menu Icon. On the B93x keypad, press the MENU softkey).
2.Press Actions to open the menu.
3.Press Reset to open the menu.
4.Enter your Code and press ENTER.
If you can not reset your sensor or detector, contact your security company
Setting date and time
B92x / B91x Keypads
1.Open the Main Menu (On the B92x keypad, press the MENU key. On the B91x keypad, press CMD then 8).
2.Use NEXT to go to the Settings menu option, then press ENTER.
3.Use NEXT to go to the Date/Time menu option, then press ENTER.
4.Enter your Code and press ENTER.
5.Press 1 or ENTER to set the control panel's date.
6.Enter the new date in MM/DD/YY format. If you make a mistake the ESC acts as a backspace key.
7.Press ENTER. The keypad shows, 'Change Complete', and then returns to the previous menu.
8.Use NEXT to go to the option to change the time, then press ENTER.
9.Enter the new time in HH:MM format. If you make a mistake the ESC acts as a backspace key.
10.Press ENTER To save the time and advance to the AM or PM Selection option.
11.To select AM, press ENTER. To select PM, press NEXT then ENTER.
12.Press ESC to exit the menu.
B94x / B93x Keypads
1.Open the Main Menu (on the B94x keypad, press the Menu Icon. On the B93x keypad, press the MENU softkey).
2.Press Settings to open the menu.
3.Press Date/Time to open the menu.
4.Press Set Date to open the menu.
5.Enter your Code and press ENTER.
6.Enter the new date in MM/DD/YY format.
7.Press SAVE or ENTER to save the change. The keypad shows 'Date Change Complete' and then returns to the previous menu.
8.Press Set Time to open the menu.
9.Press Set.
10.Enter the new time in HH:MM format.
11.For B93x keypad, press AM or PM.
12.Press SAVE or ENTER to save the change. The keypad shows 'Time Change Complete' and then returns to the previous menu.
13.Escape from the menu.
Troubles
•Press ENTER to silence Fire Troubles, Gas Troubles, Burglary Zone Troubles, and System Troubles.
•All System Trouble displays begin with 'SERV' or 'Service'. The service text clears only after the trouble condition is corrected.
Code Programming
|
Code programming for this panel is fairly involved with many steps. Customers needing assistance with code programming should be referred to their dealer. |