|
<< Click to Display Table of Contents >> FBI XL4 / XL5 |
  
|
|
<< Click to Display Table of Contents >> FBI XL4 / XL5 |
|
This file includes instructions for the FBI XL4 / XL5 panels. |
|
|
|
|
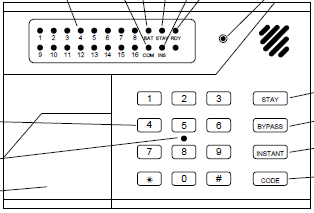
For complete instructions, click the above links for the pdf manuals. Click Thumbnails for expanded keypad views.
Standard ARMING/DISARMING
Away ARMING
Verify that the 'Ready' indicator light is on, or that the display reads 'SYSTEM READY' .
Enter a 4-digit User Code. The 'Armed' light will come on. LCD Keypads will display 'ON: AWAY'.
Stay ARMING
Verify that the 'Ready' indicator light is on, or that the display reads 'SYSTEM READY' .
Press the STAY button.
Enter a 4-digit User Code. The 'Armed' light will come on. LCD Keypads will display 'ON: STAY '.
DISARMING
Enter your 4-digit User Code to disarm anytime the system is armed.
Forced Arming
This method will automatically bypass all open zones and arm the system. This feature must be enabled by the installer
1.Press the BYPASS button.
2.Enter a valid User Code.
3.Press the BYPASS button again.
If any of the currently faulted are not bypassable, then the command will not succeed, and a long interrupted beep will follow.
BYPASSING
With the system disarmed.
1.Press BYPASS button.
2.Enter a valid User Code.
3.Enter the 3-digit Zone Number (000-072) to be bypassed.
|
Repeating this procedure will Unbypass the zone in question. |
Partition Control
Common Partition Display
The Common Partition Display allows authorized users to perform functions from any keypad within the system
1.Press # button, then 0 button.
2.Enter a valid User Code.
LCD keypads will display:
ENTER Part (0 -9) |
|
# View, * Exit |
3.Next, enter the partition that you wish to operate (1-8). The keypad will display the status of the current partition.
4.At this point you can perform any of the regular keypad functions, within your authorization level, for the requested partition.
Arm all partitions
•To arm all partitions for which you are authorized, enter a 0 into the partition select display (see above).
•This function will arm all partitions in Away Mode from the single keypad.
•A message, 'ALL SYSTEMS ARMED AND SECURED' will appear to confirm the arming.
•If any of the partitions are NOT READY, then the partitions that are NOT READY will appear on the display one at a time.
Disarm All Partitions
1.To disarm all partitions from a single keypad, enter a 9 into the partition select display (see above).
2.This command will disarm all partitions, where that user is authorized, that are currently armed.
3.The keypad will return to the original partition after about 20 seconds.
View Mode
•The View Mode allows an authorized user to view the armed status of all partition through the keypad.
•Enter a # into the partition select display (see above) and the keypad will display the armed status of all partitions for which the user is authorized.
•On LED keypads the partitions that are disarmed illuminate LEDs 9-16, and the partitions that are armed illuminate LEDs 1-8.
Alarm Memory / Status
•If alarms or other conditions such as system troubles have taken place since the initial system arming, they will appear on the display.
•The conditions that have occurred appear in the zone display section of the keypad.
•LED keypads will reflect current system status through the indicator lights as follows:
ALARM |
Fast Blinking |
BYPASS |
Slow Blinking Low Intensity |
TROUBLE |
Slow Pulse |
NOT READY |
Solid On |
•Burglary alarms will be indicated with a Steady sound, while Fire alarms will generate a Pulsing sound.
•LCD keypads will show the alarm conditions with a display as follows:
BURGLARY |
ZN 01 |
|
FRONT DOOR |
•The display shows the zones in alarm. If more than one condition has occurred, they will scroll on the display approximately every 2 seconds.
•To silence the keypad sounder, enter a 4-digit User Code.
•To clear the display of the alarm or trouble conditions and silence the audible signal, enter the 4-digit User Code again.
DOOR CHIME
1.Press the # button then the 6 button
2.Press 0 button to turn the chime On or Off.
Setting the Time
1.Press the # button, then the 3 button.
2.(If the system displays the message '(1) clock (2) arm', press the 1 button to display the clock.
3.Enter the current Hour (00-12).
4.Press the INSTANT button, then enter the Minutes (00-59)
5.To change AM/PM, press the CODE button, if necessary.
Note: The CODE button must be depressed at least once. If AM/PM setting is already correct, press the CODE button twice, to change it and then change it back.
6.Press the INSTANT button and then enter the Month (01-12)
7.Press the INSTANT button and then enter the Date (01-29)
8.Press the INSTANT button and then enter the Year (00-99)
Press the * button to exit.
PROGRAMMING User CODES
Adding/Changing User Codes
1.Press the CODE button
2.Enter a valid User Code
3.Enter the 3-digit User Number to be entered or modified (001-064 for the XL-4, 001-128 for the XL-5)
4.Enter the new 4-digit User Code
5.Enter the Authority Level (1-7) of the user being programmed (See list below).
6.Press the * key to exit.
Authority Levels are used to either permit or restrict users from certain functions. The different levels are as follows:
Authority Level |
Permissions |
Level 1 (Highest) |
Arm, Disarm, Bypass, Program Users, Change Partition Assignments in All Partitions. |
Level 2 |
Arm, Disarm, Bypass, Program Users, Change Partition Assignments in Own Partition |
Level 3 |
Arm, Disarm, Bypass, Program Users |
Level 4 |
Arm, Disarm, Bypass |
Level 5 |
Arm, Disarm |
Level 6 |
Duress Code |
Level 7 |
Arm Only Code |
Deleting User Codes
1.Press the CODE button
2.Enter a valid User Code (Must have authority level 1 or 2).
3.Enter the 3-digit User Number to be erased.
4.Press the # key.