|
<< Click to Display Table of Contents >> HAI Omni Pro |
  
|
|
<< Click to Display Table of Contents >> HAI Omni Pro |
|
This file contains information on the HAI Omni Pro panel. |
|
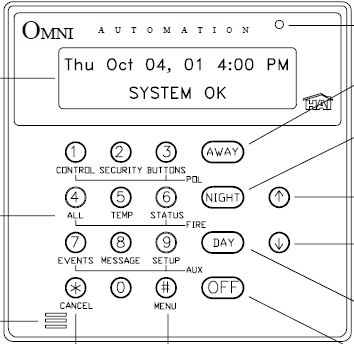
For complete instructions click the above link for the pdf manual. Click thumbnail for expanded keypad view.
Arming/Disarm
Away Arming
1.Press the # key to display the top level menu.
2.Press 2 to select SECURITY functions.
3.From the SECURITY menu, press 3 for AWAY.
4.Enter a User Code.
Day (Stay) Arming
1.Press the # key to display the top level menu.
2.Press 2 to select SECURITY functions.
3.From the SECURITY menu, press 1 for DAY.
4.Enter a User Code.
Disarming & Silencing Alarms
Turning the system OFF disarms the burglar alarm, resets the fire and emergency alarms, and silences all sirens and sounders
1.Press the OFF key.
2.Enter a 4-digit User Code.
Bypassing
Bypassing ZONES
1.Press the # key to display the top level menu.
2.Press 2 to select SECURITY functions.
3.From the SECURITY menu, press 8 for BYPASS.
4.Enter the Zone Number followed by the # key, or, use the Arrow Keys to select the zone. After the zone is entered you will be prompted to enter a User Code.
5.Enter a User Code. The bottom line will now read, 'ZONE NAME BYPASSED'.
Restoring (Unbypassing) Zones
1.Press the # key to display the top level menu.
2.Press 2 to select SECURITY functions.
3.From the SECURITY menu, press 9 for RESTORE.
4.Enter the Zone Number followed by the # key, or, use the Arrow Keys to select the zone. After the zone is entered you will be prompted to enter a User Code.
To restore all zones at once, at step 4 enter a 0. Pressing any other digit or the down arrow key first will eliminate this option.
5.Enter a User Code. The console will beep and return to the top level display.
Controlling other Areas (Partitions)
From the SECURITY menu, press the # (GOTO) key on the console keypad.
Enter the Area Number then press the # key, or, use the Arrow Keys to scroll through a list of areas. Once the Area is selected, you are prompted to enter your user code.
Enter your User Code. The top line of the display will show the name and security mode of the selected area.
Use the GOTO function again to return to the area normally assigned to that console. The console will automatically return to it's normal area after 3 minutes of inactivity at the console.
Zone Status
1.Press the # key to display the top level menu.
2.Press 6 to select STATUS functions.
3.From the STATUS menu, press 2 for ZONES.
4.Use the Arrow Keys to scroll through the zones.
5.For each zone, the display will show the Zone Name, the Zone Number, and the current Status of the zone.
Trouble Indications
•When any trouble condition occurs, the console will beep twice per second and continue to beep until the * key (cancel) is pressed to acknowledge the trouble.
•The console will say 'TRBL NOW' (trouble now) if the trouble condition actually exists while you are looking at the console.
•It will say 'HAD TRBL' (had trouble) if the trouble occurred and then corrected itself.
•The trouble conditions will include the following:
Zone Trouble
AC Power Trouble
Battery Low Trouble
Communicator Trouble (Fail To Communicate)
Fuse Trouble
Phone Line Dead Trouble
No Controller Data (Indicated when console’s alarm functions are no longer operational. This may indicate a wiring problem to the console or a more serious problem. Call your installer for service).
•To silence the trouble beeps on the console, press the * key. If more than one type of trouble has occurred, the display will show each one for two seconds. Pressing the * key will acknowledge all trouble indications.
Door Chime
1.Press the # key to display the top level menu.
2.Press 8 to select SETUP functions.
3.Enter a User Code to enter the SETUP menu.
4.From the SETUP menu press 5 for ARM.
5.Use the Down Arrow key to scroll through the options until you get to the ENTRY/EXIT CHIME option.
6.Turn the chime on or off as needed.
Setup Time & Date
1.Press the # key to display the top level menu.
2.Press 8 to select SETUP functions.
3.Enter a Master Code to enter the SETUP menu.
4.From the SETUP menu press 2 for TIME.
5.You will be prompted to enter the New Time. AM/PM must be specified for the time if that format is being used, otherwise the entered time should be 13:00-23:59.
6.You will be prompted to select Daylight Savings Time. If Daylight Savings Time is currently being observed (between sping and fall), select 1 for YES. If it is not currently being observed, select 0 for NO.
7.You will be prompted to enter the date. Enter the date in MMDDYY format.
Setup Codes
1.Press the # key to display the top level menu.
2.Press 8 to select SETUP functions.
3.Enter a Master Code to enter the SETUP menu
4.From the SETUP menu, press 1 for CODES.
5.Use the Arrow Keys to scroll through the codes.
6.To change a code, enter the new 4 digit number, then press the # key.
To delete the code enter 0000.
7.Press the Down Arrow key, and you will be prompted to enter an Authority Level for that code.
8.Select Authority Level [(1-3) 1 = Master, 2 = Manager, 3 = Standard User].
9.After the Authority Level has been selected, you will be prompted to enter Access Areas for that user.
10.After the Area(s) is/are selected, press the # key.